gallery
gallery
Showing posts with label mistress. Show all posts

Sunday, November 1, 2009

Lost the Old Bag at Highway Speed!


No, not the wife, but I got your attention didn’t I?

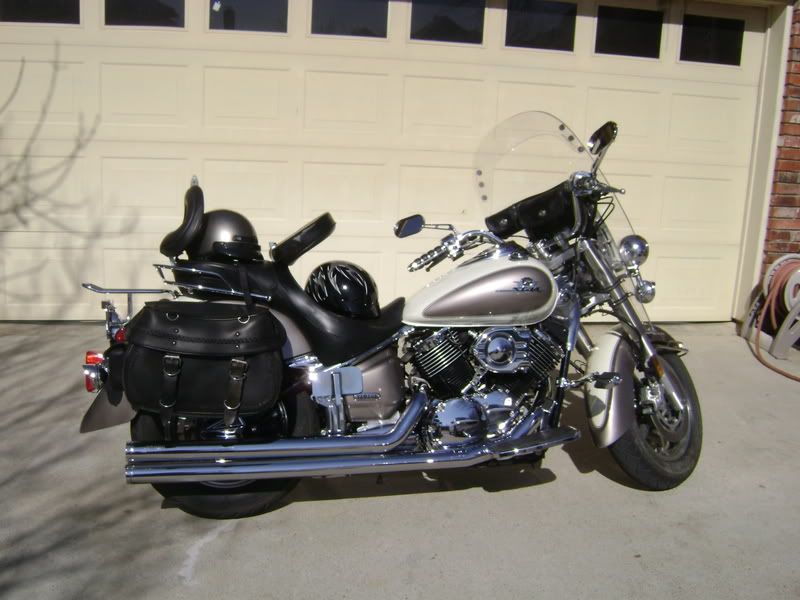
This embarrassing story actually started about five months ago. I had stopped for breakfast with a coworker on my commute to work one Saturday morning at the local Waffle House. I had just backed the bike into a parking space, removed my helmet, and started walking towards the Waffle House entrance when I glanced back at my Mistress, that’s what I call my bike, and saw the left Custom Classic Hard Leather Saddle Bag was off its rear bracket stud and was leaning down.

I had removed the bags only one time before to give the bike a good cleaning and commuted without them just that once. I rode it only partly “topless” because I had left the Memphis Shades windshield on. I have as yet never removed both bags and shield to ride her convertible style, top down.

I put it back on after eating breakfast and then rode to work and home afterwards. I looked at it again at home and the locking cam did feel like it was binding or just not closing all the way. So I emptied the bag and removed it and lubricated the mechanism with some WD40 and reinstalled the bag. I thought is felt secure, but was too lazy to take the locking bracket off the bag itself to get a better view.

Now, fast forward to a week ago, commuting back and forth to work every day as usual. I was on my homeward bound commute on a Friday in the usual D/FW rush hour traffic, wearing full leathers, impatiently weaving in and out of bog downs but mostly staying in the “fast lane”. I exited 183 Airport Freeway onto 121 north picking up velocity to normal highway cruising speed. I took my normal exit, Cheek-Sparger Rd. as usual and down shifted one time to start engine braking.

That’s when it happened. I rode over a small seam crack in the road and I heard a clunk from the left rear of my bike. I glanced back just in time to catch out of the corner of my eye the saddlebag hitting the ground and take off tumbling down the side of the road. Checking my mirror I see it go cart wheeling off the left shoulder of the exit lane and into the median grass on the side of the freeway. I merged with the access road and exited in the first parking lot.

As I park the bike I see a white pickup pulling over onto the shoulder with its hazard flashers turned on. I get off the bike and remove my helmet and start walking back up the access road. I see the driver get out of the truck and go get the saddlebag. He put it in his truck and started back down the access road in my direction. He sees me walking back up the access road and signals me he will pull into the parking lot where my bike is parked.

The Good Samaritan pulled in behind my bike and gave me back the prodigal saddlebag. I thanked him and asked if I could pay him for his extra effort. He declined and offered some bungee chords but I had a bungee net in the saddlebag. I strapped the bag to my pillion seat and thanked him again as he left.


That Saturday I took it completely apart removing the bracket from the bag. The bag itself was not damaged too badly. The hard plastic backing plate was cracked on one corner, it was scrapped and scuffed up and some of the stitching had come loose on the lid. Considering what it had been through it came out well. I managed to get the bracket lock to unbind so that it would fully lock the bracket in place. I remounted the bag on the bike and made sure it was secured properly. Then I reinstalled the contents I usually carry back inside.

This was a good luck bad luck story. It was bad luck that the Saddlebag came completely off the bike while riding, and it is not easy to get off the bike when you are purposely trying to remove it. Good luck that it did not happen while I was in the middle of traffic or the fast lane of the freeway. I believe my Guardian Angel was looking out for me again and I shudder to think of what could have happened…..

Ride on,
Torch


Reblog this post [with Zemanta]

Saturday, July 18, 2009

Yamalube Black Leather Polish Review


Yamalube Black Leather Polish Review

When I first got my V-Star I noticed the Custom Classic Hard Leather Bolt On Saddle Bags needed some attention. The leather was drying out and the black color was starting to fade. So, I went shopping for some leather treatment.

The first thing I tried was some Blue Magic Leather Cream Conditioner. It is a watery liquid in a spray bottle and the leather bags just soaked it up almost as fast I could spray it. However, this did not help with the fading issue. Next I tried some Pro Clean Leather Lotion. It is the same watery liquid but is dispensed from a squirt bottle. It too helped with the moisturizing the leather, but not with the bleached black issue.

After a year of commuting to work and my Mistress being parked out in the hot Texan sun for 12 hours at a time the black fading got even worse. I was browsing my local Yamaha Dealer when I spotted some Yamalube Black Leather Polish on a shelf. It came in a small round container about the size of a tobacco dip can. I bought it to try it out.

A few days before I tried it out I sprayed the saddle bags down real good with the Leather Cream Conditioner to let it soak in and moisturize the leather. Finally the day came when I gave the bike an extensive cleansing. After it was dried off I got out the Black Polish out and started the application. The Yamaha website says:

Black Leather Polish

Use to restore black leather to its natural luster by putting color back into the leather. Can be used for black leather jackets, boots, bags, etc.


I opened the small container of Black Leather Polish and found that it resembled black shoe polish in color. In consistency it was a lot thinner paste than shoe polish, more like a cream. I applied it using a soft cotton rag, translation, old T-Shirt. After rubbing the Black Polish into the leather I immediately noticed the black color was back on the section I had applied it.

Wow, what a difference the Yamalube Polish made in the color of the bags. I was really impressed with the difference from before and after. I really wished I could have found the camera that day to show you, but it was in one of my other vehicles, not at home at the time.

The soft consistency of the Leather Polish made it really easy to apply, even into the leather braiding my bags have. The Yamalube Black Polish sure surprised me with how well it made the saddle bags look. Torch gives the Yamalube Black Polish a M.M.M. Rating of 9.5.

Ride on,
Torch


Reblog this post [with Zemanta]

Saturday, June 27, 2009

Kuryakyn X-Tension Highway Peg Mount Review

Kuryakyn X-Tension Highway Peg Mount Review

One of the first modifications I did to my V-Star 1100 Classic “Mistress” was to add some front pegs. At 6’2” I needed a way to stretch out my legs on longer rides. I had really wanted to get some Lindby Custom Linbars, still do, but funds were not available. So I started looking at front pegs to add to my bike to stretch out and rest my tired dogs on.

In researching for front pegs I decided I wanted some that could be folded up out of the way when not in use, rather than the stationary kind. Looking online I ran across the Kuryakyn X-Tension Highway Peg Mounts on the Kuryakyn website. I think I looked there because several other add-ons on my V-Star were from Kuryakyn. I honestly don’t remember where I ordered them from, but I ordered them online from an online store that had a good price. They arrived safely packed in foam peanuts several days after they were ordered.

The Kuryakyn X-Tension Highway Peg Mounts measure 4 ½” long and have a 1 ¼” offset which allows the reach adjustment to be fine tuned for the rider. The metal is really stout and fully chromed. Another feature I really liked was that the actual foot landing pad is thicker on these pegs, not being just a post. This gives the foot more purchase area. The pad is also equipped with floating rubber grip strips. These peg mounts allow for the peg to be folded up when not in use.

Installation is straight forward and required no special tools, just normal SAE sockets or wrenches most folks have in their garage. Here we go again with SAE nuts and bolts for a metric bike. I mounted them right onto the front frame down-tubes. They have to be mounted high enough up that they do not interfere with the operation of the rear brake pedal on the right side and the shifter on the left. Do not forget to use the included locking washers.

The hardest part about installation is getting them mounted evenly from side to side on height and angle. You also have to tighten the bolt at the pivoting point to the right tension so that they will stay up when put up. It probably took less than an hour to install them.

Having an extra place to put your feet on long ride is well worth it. With my backrest on the Corbin seat and my feet up I feel like I am riding a recliner down the freeway. You can use the pegs with the toe or heel of your shoe or boot. Alternatively, you can just rest the whole back of your foot up on top of the peg. This gives you multiple choices on long rides when you need to move around for comfort.

I have not had any issues with the Kuryakyn X-Tension Highway Peg Mounts. I will warn you Chromaholics that it is painstaking to clean the tops of the pegs between the rubber traction inserts. I have found the easiest way is to use the very edge of a soft cleaning towel. You have to go back and forth like you are shining shoes, between the rubber inserts. Torch gives the Kuryakyn X-Tension Highway Peg Mounts a M.M.M. rating of 9.5.

Ride on,
Torch


Reblog this post [with Zemanta]


Friday, May 29, 2009

Memphis Shades Phenomenal Customer Service


Memphis Shades Phenomenal Customer Service

Mediocre service is easy to find these days and poor service is all too common. I work in the customer service industry and I know. I am very aware of customer service and I recognize good service when I see it and I don’t mind bragging about or tipping well, when I receive it. This is a story about phenomenal customer service.

So, there I was in the fast lane, heading home at warp 8 a month or so ago, when I notice my Memphis Shades windshield is vibrating a lot. Well, it was windier out than the campfire scene in Blazing Saddles anyway. Then I noticed the left side of the windshield appears to be flapping more than the right side. Now I’m starting to get concerned and wondering if something is wrong.

I get to my exit and stop for the light. Yes, I actually do stop on occasion. I reached up with my clutch hand, the one on my left for you non motorcyclists, and grabbed the left side of the Memphis Shades windshield and pushed and pulled on it. The whole left side was loose. I decided I would investigate further when I got home, hoping it had just come loose.

I rode into the driveway, dismounted, and inspected the windshield and how it mounted to the bike. As it turns out, the left side upper hardware that mounts the windshield to the bracket on the bike is completely missing. I torqued the remaining hardware noting ironically the use of ASE Hex head screws on my metric bike. So, I headed inside to see if I could locate some replacement hardware online.

I went straight for the Memphis Shades website. I looked up the model I had and found the hardware kit including a picture. Next, I fired off an email to Customer Service explaining my predicament. I told them of the fact that I bought the bike used with the windshield already on the bike. I informed them I was willing to purchase the missing hardware if they could direct me in the right direction. I included all the part numbers and the diagram from their website. After all, it was negligence on my part that caused it to be missing any way. Now I waited for a response.

The next day I had my email answer from Mary in Customer Service, who stated simply, “ok i will get these out.” Three days later a package arrived in the mail from Memphis Shades. I opened it and to my surprise there was two of everything I needed to repair my windshield. I also did not find any billing information, even for the shipping. I went immediately to the garage and installed the missing spacer, nut and bolt. Everything worked flawlessly and Mistress was complete once again with her Memphis Shades windshield nice and tight.

I went back inside and fired off another email to Mary at Memphis Shades Customer Service letting her know I had received the package and asked how much money I owed them. She replied back the next day to the email, “Hi Torch, you dont owe me anything. Thanks, Mary.” I was shocked, literally. Memphis Shades had just knocked my socks off with jaw dropping, eyebrow raising customer service. I was indeed wowed. It is rare that you come across that kind of customer service anywhere, anyplace, any time.

This post is to say thanks to Mary in Customer Service and to Memphis Shades for making such a fine product and going over and above in standing behind their product and in helping someone out even when they did not have too because it definitely was not a product issue.

Ride on,
Torch

Reblog this post [with Zemanta]

Monday, May 25, 2009

Song of the Rolling Sirens

Song of the Rolling Sirens

It was a dark spring morning and a blanket of ominous clouds hovered low in the sky making the air thick with humidity. I started the V-Star and her 1063 cc’s of v-twin power roared to life as I hit the garage door opener button to close the garage. It was 6:00 am and I was hoping my neighbors did not hate me and my Cobra exhaust as I turned out of the driveway and started on my commute to work.

Passing the local Waffle house on my way to the freeway the odors of waffles, eggs, sausage, and bacon, beckoned me to stop and eat. I sighed at what was not to be as I approached the light downshifting twice to turn onto the access road to get on the on-ramp to the two lane freeway. Three quarters of the way up the on-ramp my left turn signal was on as I shifted into third. I have decided that this was the most fun part of any ride, the acceleration to get up to speed, after all, there are no laws that limit how fast you can get up to the speed limit.

In no time I’m at the end of this stretch of highway as it makes a graceful right hand turn and merges with another section this time three lanes wide. Tending to run faster than the other traffic I again apply my left turn signal and change lanes twice double checking the lane next to me each time before changing lanes. In the fast lane I pulled in right behind another motorcyclist traveling slightly faster than me possibly on a Harley-Davidson by the sound of the engine.

I sped up a little to keep up with the other motorcyclist. Traffic is usually not too bad this time of the morning as long as you do not get stuck behind a row of vehicles all traveling the same speed so that you cannot get by in the fast lane. Some people will just not change lanes even though slower traffic is supposed keep right. Just about then is when I started to hear the Song.

An eighteen wheeler was in the middle lane and I was passing on the left tracking in the left hand side of my lane. As I drew closer the sound of their Song got louder. I glanced at all those wheels, each one almost half as tall as me. These Sirens are calling to me, luring me to look at them. I try to look away. Mistress, my bike, says, “Watch where we are going.” We were approaching a left hand curve on the highway.

I move lane position to the right side of my lane in preparation of the curve doing the outside, inside, outside track thing like I don’t really know how tight the curve is. This places me right next to the leviathans’ rear trailer wheels. I glance over and the Sirens Song is sweeter, louder, calling me closer as I strain to look away. “Look away, don’t stare at the beast,” I say to myself, probably out loud.

I’m slightly behind the rigs two sets of double tires now and nearing the apex of the curve. The muscles in my legs and arms tighten up and get stiff as the sirens voices start screaming louder at me as I fight to avert my eyes and turn my bike away from our deadly track. All I need to do is pull back slightly on the right handlebar and Mistress will respond leaning left and turning left out of that outer track but I find myself fighting the Sirens hypnotic Song. The Sirens Song is a screaming crescendo now pulling at Mistress and trying to make us crash against the mighty Leviathan.

My pulse has quickened and my breathing has almost stopped as I try to force her to turn left fighting against the handle bars that feel like hard taffy. She does not respond to manhandling and awaits the gentle counter steer command. The bike is at the apex of the curve now and we are sliding slowly closer into the mouth of the deadly Leviathan.

We are being drawn in, pulled by the voices of the alluring Sirens. Then, Mistress’s soothingly soft sultry voice cut through the panic brought about by the Song of the Sirens telling me, “Look away from the beast and look to where you want to go.” This was said not as an order, but in a matter of fact, common sense kind of way.

Nodding in agreement I hear her and obeyed, ignoring the Sirens command I forced my eyes to look away and into the far left track of the lane I’m traveling in. I relax my arms and gently push the left handle bar forward while pulling slightly back on the right. Mistress responds with a purr and immediately leaned left and headed into the left track out of the deadly path of the stampeding Leviathan. I blocked out the compelling Song of the Sirens and speed by the eighteen wheeled monster right as the corner ends.

Breathing once again my pulse starts to slow as I take the exit to get to work. Once at work and calmed down, I had time to reflect on what had just transpired on my normal boring commute. Call it what you want, Target Fixation or the Song of the Siren, your bike will go, maybe subconsciously, where you look. Is Target Fixation just an excuse, a Myth, or an Urban Legend? Having first hand battled it and won, I think not. So, glance at obstacles just long enough to recognize them for what they are and then look back where you want to go. If you don’t, you may succumb to the call of the Sirens, and smash into the very obstacle you are staring at, and trying desperately to avoid.

Ride on,
Torch
Reblog this post [with Zemanta]

Saturday, May 9, 2009

Look In the Direction You Are Traveling...


Even If it’s Backing Up!

No, this is not an article about Target Fixation.

So far I have helped teach four of my teenagers how to drive an automobile, and only have two more to go. I do have some hair left, but it is rapidly graying. One of the first things I try to drill in their impenetrable, all knowing heads, is to always look where you are going, especially when backing up. They always seem to have a problem with watching where they are going when backing up.

The main problem is not that they don’t initially look behind them before backing, its continuing to look while they are backing. They tend to turn back around while they are still moving backwards, instead of waiting until the vehicle has come to complete stop. And, as you know, all kinds of things can pop up behind you when backing up.

What does all of this have to do with motorcycling? Well, the same principle applies with motorcycles. You need to look in the direction you are traveling at all times, even if it is while backing up. Too bad I don’t always follow my own advice…

After commuting home from work one day I found my ’98 Ford Explorer parked fairly close to the garage door. We try to keep it parked back down the driveway so I can ride around the left side on the grass to get the bike around it and into the garage. I’m sure one of my kids did it. Anyway, I decided to be lazy and get the bike inside anyway.

I pulled around the left side into the yard and this time I pulled passed the explorer and further to the left. I was going to back into the space in front of the Explorer and down into the space in front of my ’01 Windstar, which was parked further down the driveway, and then pull into the garage. I turned the front wheel to the right, glanced behind me and started backing the V-Star 1100 back and to the right. Unfortunately, I was not looking behind me as I was rolling backwards.

In my own defense there is also a small tree to the left of the driveway I had to watch out for. Well, I was slowly rolling backwards, I thought, into the driveway when I heard and felt the crunch. I think I even heard my Mistress, (my 2003 V-Star 1100), yell, “Ouch, you moron, watch where you are going!” The bike had stopped moving and I turned around to see the left rear turn signal stalk had ran into the Explorer’s bumper and had bent the stalk forwards slightly.

After dismounting and inspecting closer the turn signal had bent at an assembly joint and the Star Turn Signal Visor was dented down. I loosened the bolt and straightened the turn signal stalk. Then I just used pliers to bend the visor back into shape as best I could. I was thankful that was all my carelessness caused. Mistress said, “Be more careful and never let it happen again”. I sighed, “Yes, Ma’am!”

What is the moral of the story? Practice what you preach, and look in the direction you are traveling at all times.

Ride on,
Torch


Reblog this post [with Zemanta]

Tuesday, March 17, 2009

Attack of the U.F.M.


Attack of the U.F.M.

It all started on a sleepy autumn morning. I rode to work early, usually getting up around 4:30 – 4:40 am and left around 5:00 – 5:10 am. Needless to say I’m usually only partially awake at that time in the morning. I don my leathers and head out to the garage.

I opened the garage door and backed Mistress, my V-Star1100 Classic, out and got the rest of my gear on, gloves, face mask, clear riding glasses, and half helmet. I tucked my lunch inside my right saddlebag. It was cold enough outside that I had trouble keeping the glasses from fogging up when I breathed out my nose. I closed the garage door and proceeded to start the bike.

First I turned the ignition key all the way on. I made sure the choke, (fuel enrichment knob), was turned all the way on. Then, I made sure the fuel cut off valve was turned down to the on position remembering that if I do not turn the fuel knob back on, I will not make it out of my neighborhood with out running out of fuel and stalling the bike. Don’t ask me how I know. I pressed the cut of switch to the run position and hit the start button.

Mistress’s 1100 V-Twin roared to life. With the Cobra exhaust, you can bet my neighbors know when I leave in the morning. I slid the fuel enrichment knob, (works like a choke), over to idle her down some and headed carefully out of my driveway onto the dark, damp streets.

It was a cold, dark and foggy Monday morning. I turned out of my neighbor hood and headed eastbound on Cheek Sparger Road. I straightened out from the turn and started to accelerate. Just then, I caught some movement just barely visible at the far reaches of the headlamp and riding lights off the side of the road. At first I didn’t pay to much attention to it, thinking it’s probably just a rabbit on the side of the road hopping around.

Then I noticed the anomaly is headed perpendicularly to my track on the road and will cross right in front of me. That’s when I spotted the glowing white beady eyes of this creature fixated on my Mistress and myself, reflected from the lights. As I got closer I could make out its size. It was larger than an alley cat and more like the size of a small dog. Now I could make out some large teeth and huge fangs in a pointy snout and large whiskers with foam trailing out the corners of its mouth.

Just then I realized what the Unidentified Flying Marsupial was. It was a very angry opossum running at full gallop across the road and headed straight for me. It looked like it was out for blood. For all I knew it could be rabid. I raised the angle on my right wrist and Mistress responded by slowing down some, both of us hoping to throw the attackers timing off. I just new it was going to either try to get up underneath my front tire and knock me off my bike or just jump straight up for a death grip on my throat.

My change in speed to throw off the timing ploy did not work. My next tactic was to aim my V-Star 1100 right at it. Mistress nodded in agreement. The logic in this approach was that, if I tried to hit a moving target, more than likely I would fail. The gargantuan opossum was at a full out run and just fixing to spring at me, its claws glistened in the riding lamps, when its head hit my front tire. It made a hollow thump type sound.

At this point neither one of us could adjust the momentum we had built up. The killer slid underneath the path of the bike. I could feel the rear of the bike lift up as the rear tire ran over the marsupials head. I knew it was its head because if it had been its body the back end of the motorcycle would have bounced up a lot higher.

In a flash it was over. Mistress and I had thwarted a deadly attack from a killer opossum and barely survived. I tried to glance back behind me and saw nothing on the roadway. But it was foggy and dark so I might not have been able to see it. I called my wife when I got to work and asked her if she had seen anything in the road, she leaves for work right after me, she had not. I looked closely again at the scene of the assault on my way home and saw nothing. The Attacker had made a clean get away.

Opossums are the other brown meat and tastes like chicken, I would imagine. Otherwise, they can be just another large, rodent looking, Unidentified Flying Marsupial obstacle in the road. Most of the time, you only get to see them with their little feet sticking up stiffly. Yep, they are just another obstacle you have to watch out for while riding a motorcycle in the Texas suburbs.
What is the moral of this story? Be prepared at any time, any place, and any conditions to react to changes in road conditions or obstacles in your path. Also remember, not all obstacles hold still for you. Sometimes obstacles have a mind of their own.

Ride on,
Torch
Reblog this post [with Zemanta]

Friday, March 6, 2009

A Variety of Bikes at Work

Several people where I work ride motorcycles. Some of them are what I call "Fair Weather Riders", they ride their bikes only when the weather is nice. A few, like myself, ride rain or shine. Either way they ride, and their motorcycles are all sharp. The bikes are a mix of all brands and styles and as unique as their personalities. I thought I would share some photos of some of the different motorcycles:

Kim's '94 Gold Wing. He just added chrome mirror trim rings with turn signals built in. He also has a '76 Gold Wing named, "Old Yeller", because of the bright yellow color. Old Yeller has a matching trailer as well.


David's 2004 Suzuki Hayabusa: 4 into 1 Yashimura Exhaust, Yoshi Program, TRE System, Custom Paint, Frame Sliders, Billit & Chrome Accessories, Mini Stalk Rear Blinkers, BMC Air-filter, BMC High Performance Coils, Blue Neon Light Kit, Steel Braided Brake Lines


Craig's Honda VTX 1800N: Cobra Exhaust, Power Commander, Blue light Kit, Riding Lights, Windshield, and more coming...


Gilberto's Kawasaki Vulcan 900 Classic LT. His wife rides a Honda Shadow.


Danny's '08 Honda VTX 1800T: Cobra Exhaust, Blue Light Kit, Lindby Engine Guards


My '03 V-Star 1100 Classic, "Mistress": See her list of adornments here.

There are several others that were not available at the time I was scouting for photos.

Ride on,
Torch
Reblog this post [with Zemanta]

Wednesday, February 18, 2009

Fiamm Freeway Blaster Horn Installation & Review


Alternate Title: Torch’s First V-Star Mod/Upgrade

Before I started using my ’03 Yamaha V-Star 1100, I wanted to give her a good "T-CLOCS" inspection. I learned about the "T-Clocks" pre-ride checklist when I took the Motorcycle Safety Foundations Basic Riders Course. You can download your own "T-CLOCS" checklist to print and use here.

"T-CLOCS" Stands for:

T-Tires & Wheels
C-Controls
L-Lights
O-Oil
C-Chassis
S-Stands

While performing this inspection I noticed what I feel is a shocking omission on the MSF’s pre-ride inspection list. I could not find the horn listed anywhere. I even used the PDF file document search and it came up empty, so I knew it was not just my oversight. If you use their list I suggest adding, "Horn if equipped," under the lighting or control section.

So, I performed my "T-CLOCS" pre-ride inspection and hit the horn button. Mistress, (my nickname for the motorcycle,) let out a soft, timid "meep" sound. I laughed out loud. Then I remembered a real humorous thread on the V-Star 1100 Riders Forum about the 1100’s apathetic Original Equipment Model horn. Someone on the forum actually coined the sound that the OEM horn makes on a V-Star as "meep". I did not think much more about it at the time.

After commuting to work for a couple of weeks in stop and go D/FW traffic, I had to opportunity to use the horn. It was the classic cage changing into my lane without looking. For those who do not know, a cage was a vehicle driving on four or more wheels. I hit the horn button on this big, bad, Yamaha, V-Star, 1100cc monster of a bike I was riding and it responded with the anemic "meep" sound. I’m not sure the sound was even audible over all the traffic noise. I could sense the other drivers around me laughing. I knew then it was time to change out the OEM horn. It had, in fact, become the first thing that I wanted to change on the bike.

Not long after that I found myself in the local Pep Boys Auto store looking at replacement horns. I saw the Fiamm Freeway Blasters and grabbed a Low Note Horn. I figured the low note would give a larger sound, which was definitely what I wanted. I got home and read the simplistic directions. I also referenced the V-Star 1100 Riders Knowledge Base in the Horn section. It appeared that it was pretty much plug-n-play. Always remember, appearances can be deceiving. Your mileage may very, as they say.

I went to the garage and started the install. The first thing was to remove the pathetic OEM horn. It had only one bolt attaching it to the upper frame between the down tubes. Once unbolted, I pulled the electrical connector off the OEM horn and it was now off the bike. That part was easy enough.

I then compared the two horns. There were a couple differences. One was that the Fiamm Freeway Blaster wiring connectors were a lot farther apart than the OEM horn connector. I thought about this dilemma and decided I could do one of two things. I could cut the OEM plastic connector in half down the middle, or fabricate a jumper harness using spade lugs and wire. I reached for my favorite knife clipped in my left front pocket and carefully cut the wiring connector in two. My favorite knife was a Kershaw Leek Speed-Safe Assisted Opening Knife my wife had given to me for Christmas. I figured it would be less obtrusive than reaching into my right front pocket and pulling out my Kel-Tec P3AT .380 and just blasting the connector.

The second difference is that the Freeway Blaster horn is larger that the OEM horn. I held the Fiamm supplied bracket up to the bike mounting spot and noted that it was too short. Then I noticed the bracket on the OEM still attached to it. So, I removed the OEM bracket from the OEM horn and held it up with the Fiamm Horn to the V-Star. The bracket went the wrong way and the horn would not fit properly. I scratched my head, flipped the OEM bracket upside down and held the Fiamm horn back up to the bike. It looked like it would work.

I attached the OEM horn bracket upside down on the Freeway Blaster. Then I attached it to the bike, bending the bracket slightly to position it correctly. I hooked up the electrical connectors I previously had set free to the new horn. I turned the key on and hit the horn button. Now it sounded like a real horn with a much deeper sound. It was not supper loud, but was definitely louder than the OEM. You can hear a sound clip at the Fiamm website here.

I noticed that the Fiamm horn protrudes out farther than the OEM. I had read of people installing horns on motorcycles and not allowing for the fender travel. This would lead to the fender hitting the horn and damaging the paint or fender. So, as a precaution, I made one more modification to the Freeway Blaster. I took a hacksaw to the front plastic portion of the horn that sticks out and lopped it off. Now I was done.

As far as a review the Fiamm Freeway Blaster Low Note Horn works as advertised. I’ve had it on for a year now and works when called upon. Eventually I want to also install an air horn on my Mistress. Torch gives the Fiamm Freeway Blaster a MMM rating of 8 on a scale of 1-10.

Ride on,
Torch
Reblog this post [with Zemanta]

Saturday, February 14, 2009

My Mistress

My Mistress is my motorcycle. It was time to take stock of what all this bike had on her. I believe that I am the third owner and the previous owners had really decked her out. It was a 2003 Yamaha Star V-Star 1100 Classic with 26,000 miles on it. Although a Classic model, She looked more like a Silverado because of all the accessories. Every time I looked at it I discovered something new. I had been keeping a running tally of all the accessories for quite some time and here is the list as best as I can discern, not in any particular order:


SS Customs Mid Range 420 Cam Kit (includes: Chubby Air Kit, Needles, and Jets)

Jardine Chrome Oil Filter Relocation Kit

Progressive Front Fork Springs

Progressive Rear Suspension Spring

Corbin Dual Touring Seat with Front & Rear Removable Backrests

Audiovox CCS100 Universal Vacuum Cruise Control

Kuryakyn Hypercharger for V-Star 1100 (vacuum is hooked up, but just for looks)

Kuryakyn ISO Grips

Kewl Metal Kewlock Grip End Helmet Locks

Star Motorcycles Floorboards with Heel & Toe Shifter

Kuryakyn Chrome Floorboard Covers

Star Motorcycles Billet Brake Brake Pedal Cover

Star Motorcycles Rear Luggage Rack

Barons Customs Sport Board Adjustable Passenger Floorboards

Star Motorcycles front Light Bar

Star Motorcycles Headlamp, Front Passing, and Front and Rear Turn Signal Visors

Clear Alternatives Clear Front Turn Signal Lenses & Amber Bulbs

Clear Alternatives Smoke Rear Turn Signal Lenses

Radiantz LED Rear Turn Signal Conversion Kit

Kuryakyn 7" Halogen Headlight Wave Cut Tri-bar with Black Dot

Kuryakyn Chrome Brake Master Cylinder Cap

Chrome Rear Brake Fluid Reservoir Cover

Kuryakyn Magnum Plus Mirrors

Kuryakyn Billet Chrome State Inspection Plate

Cobra Speedster Longs Exhaust

Memphis Shades Windshield


Memphis Shades Lowers

Laminar Lip on Windshield

Leather Three Pocket Windshield Bag With Braiding

Star Motorcycles Front Fender Trim Bumper

Custom Classic Hard Leather Bolt On Saddle Bags with Braid & Pocket

Easy Brackets Saddle Bag Quick Detachable Brackets.

Kuryakyn Chrome Neck Covers

Clocks 4 Bikes Chrome Handlebar Clock, Original Mount with White Faceplate

Clocks 4 Bikes Chrome Handlebar Thermometer, Original Mount with White Faceplate

Kuryakyn Chrome Mid-Frame Cover

Kuryakyn Lighted License Plate Frame

Kuryakyn Chrome Boomerang Frame Trim

Kuryakyn Chrome Handlebar Control Covers

Show Chrome Celestar Rear Brake Master Cylinder Cover

Kuryakyn Phantom Swingarm Chrome Cover

Avon Venom-R Tyres


Here is the list of things I have added or upgraded since I purchased her:


Replaced the OEM horn with a Black Fiamm Freeway Blaster Low Note Horn

Binetto YTX14-BS High Performance AGM ATV/Motorcycle Battery

Stebel Nautilus Compact Chrome Air Horn

Kuryakyn X-Tension Pegs

Replaced front Avon Venom-R Tyre with Metzler ME 880 Marathon

Replaced worn/missing Star Motorcycle Billet Brake Pedal Cover Rubber Inserts

Replaced one Cobra Dragster Long Exhaust tip, lost while riding

Battery Tender Connector to battery for Battery Tender Jr.


I will be writing reviews and stories of these projects and upgrades in the future. I will also be reviewing the riding gear I have picked up and used along the way.


Ride on,

Torch

Reblog this post [with Zemanta]

Thursday, January 29, 2009

Introductions and Purpose

Let me introduce myself. I am Torch. I ride a motorcycle named Mistress. I am a very inexperienced rider and have only been riding her now for about a year. I live in the D/FW, (Dallas / Fort Worth, Texas) Metroplex and commute a short distance to work almost daily on her. As of yet, (Jan. 29, 2009) ,I have not been on any long trips on her, but I plan to in the future.

The musings on this blog are for several reasons:

One is to document my experiences of picking up motorcycling in my middle years.

Two, is for shear entertainment. Humorous things happen down the road of life. Sometimes they are not very funny at the time and can even be downright frustrating. However, looking back in retrospect they can be hilarious. After all, if you cannot laugh at yourself, who can you laugh at?

Three, is that others may benefit from my experiences and learn from my mistakes, failures, and successes.

Lastly, it let’s me hone up on my writing skills and someday, maybe, I could put them into a book one day.

Ride on,
Torch
Reblog this post [with Zemanta]